
Configuring the NSG
NOTE: By default, NSGs are configured to block all incoming and outgoing traffic until you create the required rules. This means that you will not be able to connect to the VMs without creating the appropriate rules to allow traffic (e.g. port 3389 for Windows Remote Desktop, or port 22 for SSH)
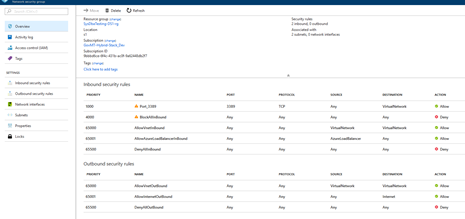
As part of the on-boarding process, all resource groups come pre-configured with two Network Security Groups (NSGs) for each subnet (Frontend & Backend) as shown below:

The NSG acts as a Firewall for your subnet – from it you can filter and manage all incoming and outgoing traffic just as you would do with a normal hardware or software Firewall. To configure it, you must click on the respective NSG service within your resource group. Remember that VMs connected to the Backend subnet need to have rules created on the Backend NSG, and VMs connected to the Frontend subnet need to have rules created on the Frontend NSG.
For VMs placed on the Frontend subnet, please attach the Frontend NSG directly to the NIC or else the rules will not apply to the VM and it will be open to MAGNET
The process is the same whether it is on Azure Stack or Azure.
Adding, Editing, & Deleting NSG Rules
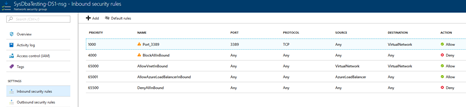
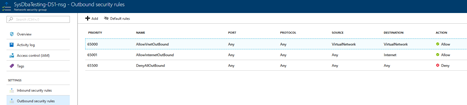
After clicking on either “Inbound Security Rules” or “Outbound Security Rules” you will be presented with a screen like the below:
To add a new rule, click on “Add” above, or to edit a rule, click on the rule itself to present you with the following screens which slide in from the right:
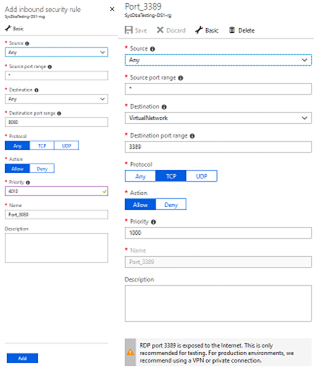
Note that when you edit the rule, you can also delete it altogether by clicking on the “Delete” button above.
When adding or editing a rule you will need to:
- Choose the source – this can be either be set to:
- Any Source
- IP Addresses, where you have the choice to either enter a whole subnet (e.g. 172.16.0.0/24), a specific IP address (e.g. 172.16.0.128), or a list of IPs/Subnets in a comma-delimited format.
- Service Tag – You can add tags to the VMs you created so that you can use them instead (so one tag would equal multiple VMs, etc.) or use one of the predefined tags like “Internet” for example.
- Source Port Range, where you can either enter “*” for any source port which is the usual procedure, one port (e.g. 3389 for RDP), or a whole range (e.g. 100-1000).
Cases where specifying a source port instead of “*” any port would be if you have one end sending out traffic under a non-standard port (e.g. Exiting a NAT) into a destination which is standard (34595 to 22).
- Destination – this can be either set to:
- Any Destination (Generally not advised – It is best to point it towards a certain IP or a whole subnet)
- IP Addresses, where you have the choice to either enter a whole subnet (e.g. 172.16.0.0/24), a specific IP address (e.g. 172.16.0.128), or a list of IPs/Subnets in a comma-delimited format.
- Virtual Network, where you point to a whole virtual network rather than a specific subnet or IP address
- Destination Port Range where you can either enter one port (e.g. 3389 for RDP) or a whole range (e.g. 100-1000)
Protocol which can be either Any, TCP, or UDP- Action, which can be either Allow or Deny
- Priority – The NSG imposes rules in order of their priority with lower numbers being imposed before the higher numbers. So, for
example if a rule that denies all access is higher than a rule that allows access to a certain port, then you will not be able to connect to it until the rule that allows access to the port is given a higher priority (e.g. priority 3000 before priority 4000). - A name to give the rule. Make sure it is unique
- A description